
Chocolate stands as one of the most beloved yet technically demanding ingredients in the culinary world. Whether you’re crafting delicate truffles, perfecting a ganache, or simply seeking richer brownies, understanding what happens behind the scenes transforms your results from acceptable to exceptional. The difference between a dull, grainy chocolate dessert and one with a glossy finish and satisfying snap lies not in expensive equipment, but in mastering fundamental principles.
This comprehensive resource demystifies chocolate from multiple angles: selecting quality products, understanding the fascinating science of cocoa butter, applying proper tempering methods, maximizing flavor potential, and preserving your investment through correct storage. Each section builds your confidence to work with chocolate as professionals do, turning what seems like culinary magic into reliable, repeatable technique.
Not all chocolate performs equally in the kitchen. The foundation of successful chocolate work begins with selecting the right product for your specific application, and this requires understanding what actually constitutes quality.
Cocoa powder comes in two fundamental categories that behave very differently in recipes. Natural cocoa powder maintains an acidic pH (around 5.0-6.0), which activates baking soda and creates rise in cakes and cookies. Dutch-processed cocoa, treated with alkalizing agents, reaches a neutral to slightly alkaline pH (7.0-8.0), producing deeper color and mellower flavor but requiring baking powder instead. Substituting one for the other without adjusting leavening agents leads to flat, dense baked goods or overly risen, bitter results.
Fat content varies significantly between commercial powders, ranging from 10% to 24%. Higher fat content delivers richer mouthfeel and more intense chocolate flavor, particularly valuable in frostings, hot chocolate, and applications where cocoa powder provides the primary chocolate presence. Lower fat varieties work well when combined with other fats or when you need chocolate flavor without additional richness.
Elite chocolate for baking reveals its quality through several physical characteristics. The snap quality—that crisp, clean break when you bend a chocolate bar—indicates proper tempering and high cocoa butter content. Chocolate that bends without breaking or crumbles into dusty fragments signals either poor quality, improper storage, or the presence of compound coatings (made with vegetable fats instead of cocoa butter).
Couverture chocolate, distinguished by its minimum 31% cocoa butter content, flows beautifully when melted, making it ideal for coating, enrobing, and creating smooth ganaches. This exceptional fluidity comes from the higher proportion of cocoa butter, which also contributes to superior mouthfeel and more pronounced chocolate flavor as it melts perfectly at body temperature.
Chocolate’s behavior in the kitchen stems from fascinating chemical properties that, once understood, give you precise control over your results. Two aspects deserve particular attention: how cocoa interacts with other ingredients and how cocoa butter crystallizes.
The acidity or alkalinity of your cocoa directly affects how batters rise and develop structure. When natural cocoa’s acids encounter baking soda (an alkali), they create a neutralization reaction that releases carbon dioxide bubbles, providing lift. Think of it like the classic vinegar-and-baking-soda volcano—that same chemistry happens in your mixing bowl. Dutch-processed cocoa, already neutralized, won’t trigger this reaction, requiring the independent action of baking powder instead.
This interaction extends beyond leavening. Acidic cocoa strengthens gluten networks, producing sturdier cakes, while alkaline Dutch cocoa creates more tender crumbs. Understanding this distinction allows you to intentionally manipulate texture outcomes.
Cocoa butter can solidify into six different crystal structures, called polymorphic forms, each with distinct melting points and physical properties. Only one form—Form V (beta crystal)—delivers the qualities we associate with properly handled chocolate: glossy appearance, firm snap, and stability at room temperature. The other forms produce soft, crumbly, or bloom-prone chocolate.
This explains why simply melting and cooling chocolate doesn’t work. Without intervention, cocoa butter crystallizes into a random mixture of unstable forms. The tempering process specifically encourages Form V crystals while discouraging others, creating chocolate that sets properly and maintains quality over time.
Tempering—the controlled crystallization of cocoa butter—separates amateur chocolate work from professional results. While the science sounds complex, the practical techniques are remarkably accessible once you understand the working temperature windows.
The seeding method introduces stable Form V crystals into melted chocolate, which then propagate throughout the batch like starter culture in yogurt. Here’s how it works in practice:
This method offers the most consistent results for home bakers because it requires only a thermometer and patience—no marble slabs or specialized equipment needed.
Tempered chocolate remains workable only within a narrow temperature range, typically a 2-4°F window depending on chocolate type. Drop below this range and the chocolate thickens too much to work with; rise above it and you lose temper, requiring the entire process to restart. Professional chocolatiers maintain this window by working in temperature-controlled rooms or using warming lamps. At home, brief moments over a warm water bath (ensure no steam contact) bring chocolate back into range when it thickens excessively.
Beyond technical success lies the realm of flavor optimization—techniques that elevate chocolate’s sensory impact from merely present to genuinely memorable.
Several strategies amplify perceived chocolate flavor without simply adding more chocolate. Blooming cocoa powder—mixing it with hot liquid or melted butter before incorporating into batters—unlocks volatile flavor compounds that remain muted in dry cocoa. Adding a small amount of espresso powder (roughly 1-2 teaspoons per cup of cocoa) enhances chocolate perception without imparting coffee flavor, much like salt enhances sweetness.
Using both cocoa powder and melted chocolate in the same recipe creates flavor complexity: cocoa powder contributes intense, pure chocolate taste, while melted chocolate adds richness and depth. This layering technique explains why professional chocolate cakes often surpass simpler home recipes.
Single-origin chocolates carry distinct flavor profiles reflecting their growing regions—fruity notes from Madagascar, earthy undertones from Ecuador, or nutty characteristics from Venezuela. These subtle terroir expressions shine brightest in applications with minimal competing flavors. A simple chocolate mousse, made with just chocolate, eggs, and cream, allows these nuances to speak clearly, whereas heavily spiced or flavored desserts mask them entirely.
To preserve these delicate notes, avoid overheating during melting (never exceed 120°F/49°C) and pair with complementary rather than contrasting flavors. A hint of sea salt or vanilla amplifies terroir characteristics; strong spices or liqueurs overwhelm them.
Even perfectly selected and handled chocolate degrades without appropriate storage. Understanding how to preserve quality prevents waste and maintains the characteristics you’ve worked to achieve.
Chocolate thrives in cool, dry, dark environments with stable temperatures between 65-70°F (18-21°C) and humidity below 50%. Temperature fluctuations pose the greatest threat, causing cocoa butter to melt and recrystallize improperly or drawing moisture to the surface. This explains why refrigeration, despite seeming logical, often causes more problems than it solves—the temperature shock when removing chocolate from cold storage creates immediate condensation.
Different chocolate forms have varying vulnerability levels:
Fat bloom appears as grayish-white streaks or spots when cocoa butter separates and recrystallizes on the surface, typically caused by temperature fluctuations. Sugar bloom creates a rough, grainy surface when moisture dissolves surface sugar, which then recrystallizes as the chocolate dries. While neither affects safety, both compromise appearance and texture.
Prevention focuses on stability: wrap chocolate tightly to exclude moisture, maintain consistent storage temperatures, and allow refrigerated chocolate to warm gradually while still wrapped. If bloom occurs, the chocolate remains perfectly usable for melting and baking, though unsuitable for decorative purposes requiring glossy appearance.
Chocolate frostings and ganaches seize, separate, or develop grainy textures when water content, temperature, or mixing technique goes awry. Seizing—when smooth chocolate suddenly becomes thick and grainy—occurs when small amounts of water contact melted chocolate. Paradoxically, adding more liquid (cream or warm water, tablespoon by tablespoon) often rescues seized chocolate by creating an emulsion.
Grainy frostings usually result from overheating chocolate or adding cold dairy to warm chocolate. The solution involves patience: ensure chocolate never exceeds 115°F (46°C) during melting, and bring all ingredients to similar temperatures before combining. When making ganache, warm cream should pour over chopped chocolate, then rest undisturbed for several minutes before gentle stirring begins.
With these foundational principles firmly in hand—from selecting quality products and understanding the chemistry at play, to mastering tempering techniques and preserving your chocolate properly—you possess the knowledge that transforms chocolate from a mysterious ingredient into a reliable medium for creating exceptional results. Each concept builds upon the others, forming an integrated approach that serves you across countless applications, from everyday baking to ambitious confectionery projects.

In summary: Success depends on controlling cocoa butter’s polymorphic crystallization, not ambient temperature. The seeding method, combined with sensory checks like the “lip test,” offers precise control without a thermometer. Humidity is a primary cause of sugar bloom; managing moisture…
Read more
The true difference between Valrhona and Callebaut isn’t taste—it’s technical performance dictated by fluidity and cocoa genetics. Fluidity, not brand, determines success in applications like ganache and thin molding. Bean variety (Criollo vs. Forastero) impacts flavor complexity, but the quality…
Read more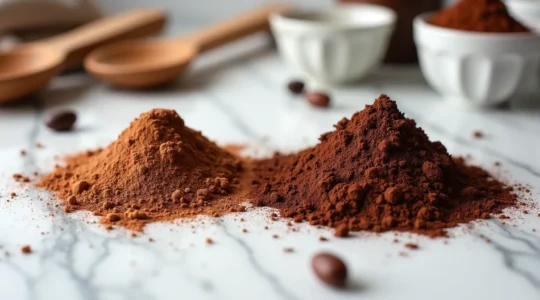
The secret to mastering chocolate baking isn’t just knowing the pH difference between natural and Dutch-processed cocoa; it’s understanding how fat, processing, and technique build the final texture and flavor of your dessert. Natural cocoa’s acidity reacts with baking soda…
Read more