
The secret to mastering chocolate baking isn’t just knowing the pH difference between natural and Dutch-processed cocoa; it’s understanding how fat, processing, and technique build the final texture and flavor of your dessert.
- Natural cocoa’s acidity reacts with baking soda for lift, creating lighter, fluffier cakes.
- Dutch-processed cocoa, being neutral, delivers a darker color and deeper, less acidic flavor, ideal for rich frostings and dense brownies when paired with baking powder.
Recommendation: Choose your cocoa based on the desired result. For a light, tangy chocolate cake, use natural cocoa. For a fudgy, intensely dark brownie, a high-fat Dutch-processed cocoa is superior.
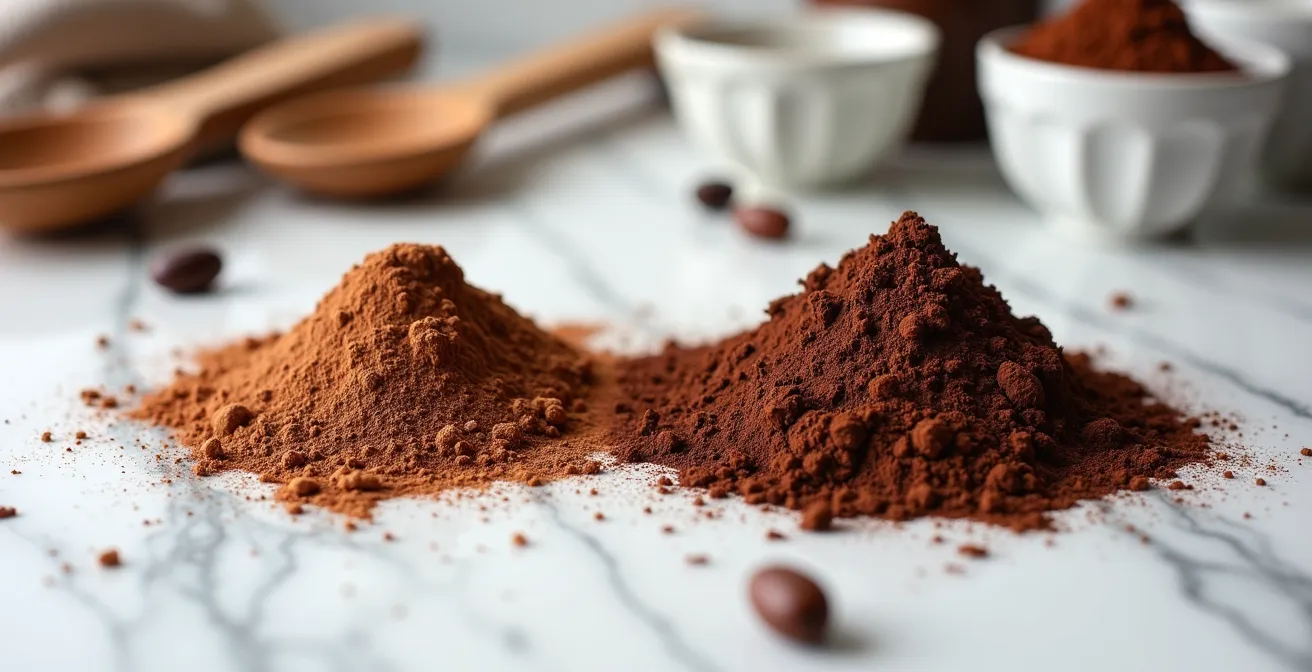
Standing in the baking aisle, you face a familiar choice: a canister of natural cocoa powder next to one labeled “Dutch-processed” or “alkalized.” You’ve likely heard the common advice: one is acidic and works with baking soda, the other is neutral and pairs with baking powder. While this is true, it’s only the first chapter of a much more complex and fascinating story. Relying solely on this pH rule is like judging a wine only by its color; it ignores the nuances of flavor, texture, and aroma that truly define the final experience.
The difference between a good chocolate bake and a great one often lies in understanding the ingredient’s hidden properties. The choice of cocoa powder is not merely a chemical decision for leavening; it’s an architectural one. It dictates the fudginess of a brownie, the silkiness of a frosting, and the depth of flavor in a hot chocolate. It influences everything from the final color of your cake to its mouthfeel. This guide moves beyond the simple acid-versus-alkaline debate to explore cocoa as a multifaceted ingredient, where variables like fat content, preparation technique, and even the bean’s origin story are the real keys to unlocking bakery-quality results in your own kitchen.
This article will deconstruct the science and art of cocoa powder. We will explore how these different powders influence leavening, flavor, texture, and even shelf life, empowering you to make a deliberate, informed choice for every recipe you tackle.
Summary: Mastering the Science of Cocoa for Every Bake
- Why Using the Wrong Cocoa Can Stop Your Cake from Rising?
- How to “Bloom” Cocoa Powder to Unlock 50% More Flavor?
- High-Fat vs. Low-Fat Cocoa: Which Creates a Fudgier Brownie?
- The Sifting Mistake That Leaves Lumps in Your Cocoa Buttercream
- When to Throw Out Cocoa Powder: Signs of Rancidity You Ignore
- Why High-Fluidity Chocolate is Bad for Ganache?
- Why a Light Roast Disappears Behind 80% Dark Chocolate?
- Valrhona vs. Callebaut: Which Grand Cru for Tempering?
Why Using the Wrong Cocoa Can Stop Your Cake from Rising?
The most immediate and dramatic effect of choosing the wrong cocoa powder is on your bake’s texture and rise. This is where the well-known pH rule comes into play. Natural cocoa powder is acidic, just as it is when extracted from the cacao bean. According to food science resources, natural cocoa has a pH of 5-6, giving it a distinct sharpness and a lighter, reddish-brown color. This acidity is a crucial component in chemical leavening. When paired with an alkaline ingredient like baking soda, a reaction occurs, producing carbon dioxide gas. These gas bubbles get trapped in the batter, causing it to rise and creating a light, tender crumb.
Dutch-processed cocoa, on the other hand, has been washed in an alkaline solution to neutralize its acidity. This process, known as alkalization, raises its pH to a neutral 7, resulting in a darker, sometimes almost black, color and a smoother, less bitter flavor. Because it’s no longer acidic, it will not react with baking soda. If a recipe calls for baking soda and you use Dutch-processed cocoa, you will miss out on that critical leavening reaction, potentially resulting in a dense, flat, and gummy cake.
Recipes that use Dutch-processed cocoa typically rely on baking powder for leavening. Baking powder is a self-contained leavening system, containing both an acid and a base. It doesn’t need an acidic ingredient in the batter to work. Therefore, using natural cocoa in a recipe designed for Dutch-processed cocoa can introduce too much acid, which can cause the bake to rise rapidly and then collapse, or result in a sour, metallic taste. Always check your recipe’s leavening agent to make the correct choice.
How to “Bloom” Cocoa Powder to Unlock 50% More Flavor?
Beyond leavening, the most significant impact of cocoa powder is its flavor. However, simply mixing dry cocoa powder into batter leaves much of its aromatic potential locked away. The technique of “blooming” is a simple yet transformative step that can dramatically deepen and intensify the chocolate flavor in any recipe. Blooming involves mixing the cocoa powder with a hot liquid—such as hot water, coffee, or melted butter—and letting it sit for a minute or two before adding it to the other ingredients.
This process works in two ways. First, the heat helps to dissolve the cocoa powder more thoroughly, eliminating the risk of dry clumps and ensuring a smooth, uniform texture. Second, and more importantly, the hot liquid wakes up the volatile flavor compounds within the cocoa. It rehydrates the cocoa’s starch particles and helps release the trapped cocoa solids, which carry the deep chocolate notes. The result is a richer, more complex, and far more pronounced chocolate taste. You’re not just adding cocoa flavor; you’re actively unlocking it.
This technique is particularly effective for Dutch-processed cocoa. As explained by baking experts, the higher fat content in many Dutch-processed cocoas becomes even more luxurious when bloomed in a warm fat like butter or oil, creating an unparalleled fudgy intensity. The visual transformation is immediate and telling.
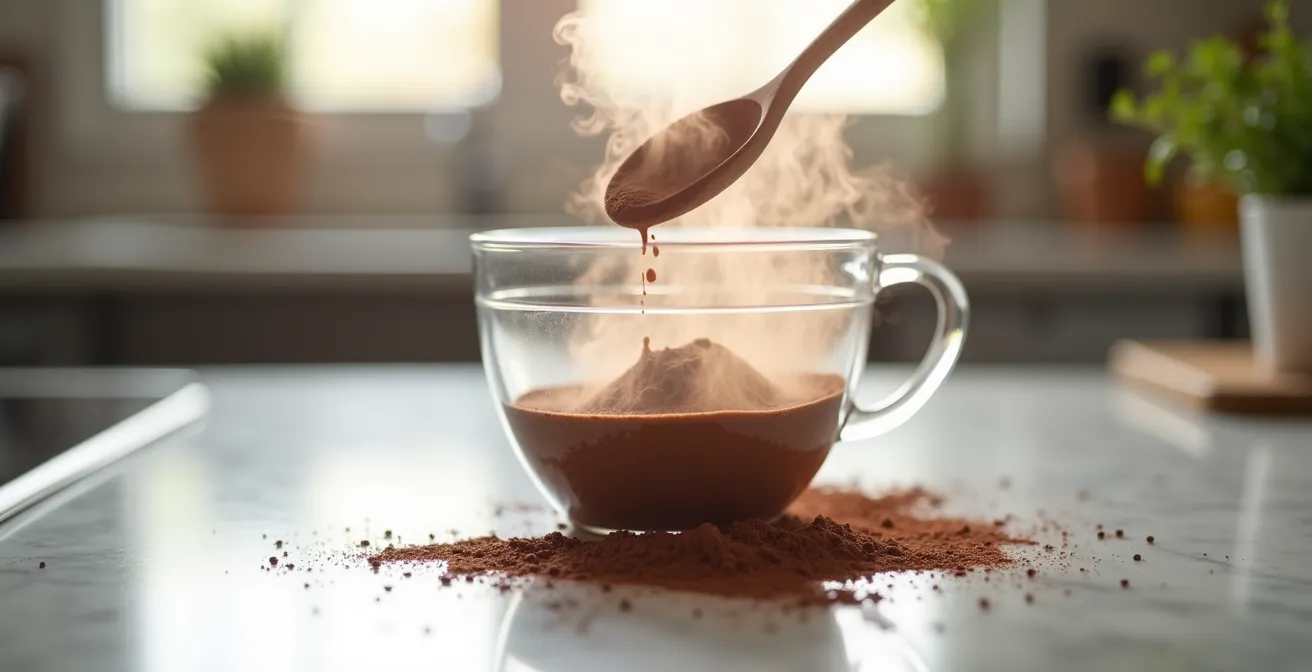
As you can see, the dry, dull powder transforms into a glossy, dark, and aromatic paste. This simple step takes only a few minutes but can elevate your chocolate bakes from good to unforgettable. Whether you’re making a cake, brownies, or a simple frosting, blooming your cocoa is a professional technique that every home baker should have in their arsenal to build a more profound sensory architecture in their desserts.
High-Fat vs. Low-Fat Cocoa: Which Creates a Fudgier Brownie?
While pH and blooming are critical, another variable often overlooked on nutritional labels is the fat content. Cocoa powder is what’s left after most of the cocoa butter is pressed out of the cacao bean, but “most” is a relative term. The amount of residual cocoa butter makes a massive difference in the final texture of your baked goods, especially in recipes where a rich, fudgy texture is desired, like brownies.
Standard or low-fat cocoa powders, typically found in most supermarkets, contain about 10-12% cocoa butter by weight. They have a higher starch content, which can absorb more liquid and result in a drier, more cake-like structure. For light and airy chocolate cakes or for dusting a tiramisu, this is often perfectly acceptable. However, for a truly decadent and moist result, a high-fat cocoa powder is superior. Premium and many Dutch-processed cocoas are considered high-fat, containing 22-24% cocoa butter.
This additional fat contributes significantly to the final product’s richness and mouthfeel. According to extensive testing, cocoa powder with 20-24% fat creates moister baked goods with a more tender crumb. The higher fat and lower starch content result in a less absorbent powder, leading to a fudgier, denser texture that melts luxuriously in your mouth. For brownies, truffles, or pot de crème, this difference is not subtle; it’s the key to achieving a truly luxurious, melt-in-your-mouth experience.
This comparative table clearly breaks down the properties and best uses for each type, guiding your choice based on the desired final texture.
| Property | Low-Fat (10-12%) | High-Fat (22-24%) |
|---|---|---|
| Texture Result | Drier, more cakey | Fudgier, moister |
| Cocoa Butter Content | 10-12% | 22-24% |
| Starch Content | Higher | Lower |
| Best For | Light cakes, dusting | Brownies, truffles |
| Mouthfeel | Standard | Luxurious, melts at body temp |
The Sifting Mistake That Leaves Lumps in Your Cocoa Buttercream
There’s nothing more disappointing than a silky buttercream or a smooth cake batter ruined by stubborn, dry lumps of cocoa powder. Many bakers instinctively reach for a sieve, and while sifting is a good first step, it often isn’t enough to solve the problem completely. The reason lies in cocoa powder’s hygroscopic nature—it actively attracts and absorbs moisture from the air. This causes fine particles to clump together with a force that even a fine-mesh sieve can’t always break.
When these tenacious clumps are mixed into a high-fat medium like buttercream or a thick brownie batter, they become coated in fat. This fat creates a waterproof barrier around the dry cocoa, preventing it from dissolving. No amount of whisking will break them down at this stage; they remain as little pockets of bitter, dry powder in your final product. This is the sifting mistake: relying on it as a foolproof solution when it only addresses part of the problem.
A far more effective professional technique is the “slurry method.” Instead of adding dry cocoa to your mix, you first create a smooth, thick paste. This method guarantees a perfectly smooth and homogenous result every time. By dissolving the cocoa in a small amount of liquid first, you ensure every particle is hydrated before it’s introduced to the larger batch, completely bypassing the clumping issue.
- Measure your cocoa powder into a small bowl.
- Add 2-3 tablespoons of the recipe’s liquid (such as cream, milk, or even melted butter).
- Mix vigorously with a small whisk until a thick, smooth, and lump-free paste forms.
- Check for any remaining dry pockets at the bottom of the bowl and break them up.
- Gradually add this smooth slurry into your main batter or buttercream base and mix until incorporated.
This method ensures your cocoa is fully integrated, leading to a deeper color, smoother texture, and no unpleasant, gritty surprises.
When to Throw Out Cocoa Powder: Signs of Rancidity You Ignore
Cocoa powder, like any food product, has a finite shelf life. Because it’s a dry good, many home bakers assume it lasts indefinitely. While it won’t spoil in the same way as fresh ingredients, its quality degrades over time, particularly its flavor and aroma. The fats within the cocoa powder, especially in high-fat varieties, are susceptible to going rancid. Using old, stale cocoa powder can impart a dull, dusty, or even off-putting flavor to your bakes, undoing all your hard work.
The primary enemy of cocoa powder is exposure to air, light, moisture, and strong odors. Store it in a cool, dark, and dry place in a well-sealed, airtight container. A pantry is ideal, but avoid storing it next to potent spices like cinnamon or curry powder, as the cocoa fats can absorb these aromas. The best way to determine if your cocoa is still good is to trust your senses. Fresh cocoa has a rich, complex, and unmistakably chocolatey smell. As it ages, this aroma fades and can be replaced by a musty or cardboard-like scent.
For high-fat cocoa powders, the signs of rancidity are even more distinct. This expert advice is crucial for identifying when your key ingredient has turned.
Fresh cocoa smells rich and chocolatey; old cocoa smells dusty, musty, or like a cardboard box. For high-fat cocoa, a waxy, crayon-like smell is a clear sign of fat rancidity.
– Donald Wressell, Guittard Chocolate Company Executive Pastry Chef
If your cocoa powder fails the smell test, it’s time to replace it. A great bake starts with great ingredients, and using fresh, high-quality cocoa is a non-negotiable first step.
Your Action Plan: Cocoa Powder Freshness Test
- Perform the smell test: The powder should smell rich and deeply of chocolate. Discard if it smells dusty, musty, or waxy like a crayon.
- Check for visual changes: Look for any signs of graying, which could be fat bloom, or a significant fading of its original color.
- Test its solubility: Mix a small amount into hot water. Fresh cocoa should dissolve relatively easily, while old cocoa may resist dissolving and form stubborn clumps.
- Taste a tiny pinch: It should have a bold, distinct chocolate flavor. If it tastes bland, stale, or flat, its best days are behind it.
- Review its storage location: Ensure your container is airtight and move it away from any sources of moisture, heat, or strong-smelling spices.
Why High-Fluidity Chocolate is Bad for Ganache?
The principles we’ve learned about cocoa powder—especially regarding fat content—extend to chocolate in solid form. When making a ganache, which is a simple emulsion of chocolate and cream, the properties of the chocolate are paramount. A common mistake is to assume that any high-quality dark chocolate will work. However, the fluidity of the chocolate, which is largely determined by its cocoa butter content, is a critical factor.
Couverture chocolate, favored by professionals for tempering and enrobing, is defined by its higher percentage of cocoa butter (typically 31% or more). This extra cocoa butter makes it melt into a very fluid, thin consistency. While this is perfect for creating a thin, crisp shell on a bonbon, it can be problematic for a classic ganache. The high ratio of fat-to-solids can make the emulsion unstable. When mixed with cream, a high-fluidity chocolate is more likely to “break” or separate, resulting in a greasy, grainy texture instead of a smooth, silky one.
For a stable, foolproof ganache, you need a chocolate with a balanced ratio of cocoa butter to cocoa solids. A chocolate that is less fluid, with a slightly lower cocoa butter content, provides more solids for the emulsion to form around, creating a more stable structure. This doesn’t mean using low-quality chocolate; rather, it means choosing a chocolate that isn’t specifically designed for high-fluidity applications. If you do find your ganache has broken, don’t throw it out. It can often be rescued by slowly whisking the broken mixture into a small amount of warm milk or cream, which helps to re-form the delicate emulsion.
Why a Light Roast Disappears Behind 80% Dark Chocolate?
The final, and perhaps most nuanced, layer of flavor in chocolate comes from the roasting of the cacao beans. Just like with coffee beans, the roasting profile has a profound impact on the final taste. A light roast can preserve the delicate, complex, and often fruity or floral “origin” notes of a specific bean. A heavy roast mutes these subtleties and develops the deep, classic “chocolatey” flavors we are all familiar with, along with more bitterness.
Where bakers often go wrong is in pairing a high-end, lightly roasted chocolate with a recipe that calls for a very high cocoa percentage. The percentage on a chocolate bar represents the total amount of ingredients derived from the cacao bean (cocoa solids + cocoa butter). As this percentage increases, the amount of sugar decreases, leading to a more intense and bitter flavor profile. In fact, flavor science research indicates that chocolates above 80% cocoa show exponentially increased bitterness.
This intense bitterness, a hallmark of very dark chocolates, can completely overwhelm the delicate and nuanced flavors of a lightly roasted bean. The subtle notes of red fruit, citrus, or flowers that make a specific single-origin chocolate special are simply bulldozed by the potent, roasty bitterness of an 85% or 90% formulation. As chocolate experts point out, a light roast’s unique personality is best showcased in lower-percentage dark chocolates (around 50-70%) or milk chocolates, where there is more “space” in the flavor profile for its subtleties to shine through. When you want intense, dark chocolate impact, a heavier roast is not only more appropriate but also more cost-effective.
Key Takeaways
- The choice between natural and Dutch-processed cocoa fundamentally alters a recipe’s leavening, flavor, and color.
- Beyond pH, cocoa’s fat content is a critical factor for texture; high-fat cocoa (22-24%) creates fudgier, moister results.
- Techniques like “blooming” cocoa in hot liquid and creating a “slurry” are essential for unlocking full flavor and ensuring a smooth texture.
Valrhona vs. Callebaut: Which Grand Cru for Tempering?
Putting all this theory into practice, let’s consider two of the most respected professional chocolate brands: Valrhona from France and Callebaut from Belgium. For a home baker looking to elevate their craft, choosing between them can be daunting. Both offer exceptional quality, but they embody different philosophies that make them better suited for different applications, particularly in a technical task like tempering.
Valrhona is often celebrated for its “goût du terroir,” a focus on the unique flavor profile of the beans from a specific origin. Their chocolates are known for being complex, often with pronounced acidic, fruity, or wine-like notes. This makes them a favorite among pastry chefs for artisanal, flavor-forward creations where the chocolate is the star. However, this complexity can come at a price: Valrhona chocolates can be less forgiving to temper, requiring precise temperature control to achieve a perfect snap and shine.
Callebaut, on the other hand, is built on a philosophy of consistency and workability. Their chocolates tend to have a more balanced, accessible, and classically “chocolatey” flavor profile. They are designed to be reliable workhorses in high-volume professional kitchens. For this reason, many find Callebaut chocolates to be more forgiving and easier to work with, especially for those new to tempering. It provides consistent results time after time, making it a professional standard for everything from molding to ganaches.
Ultimately, the “better” brand depends entirely on your goal, as this comparison of Valrhona and Callebaut highlights. For an artistic dessert showcasing unique flavor notes, Valrhona is an excellent choice. For reliable, high-quality results in a wide range of applications, Callebaut is a trusted and more forgiving option.
| Aspect | Valrhona | Callebaut |
|---|---|---|
| Philosophy | Flavor-forward, complex | Consistency, reliability |
| Flavor Profile | Acidic, wine-like notes | Balanced, accessible |
| Best For | Artisanal, connoisseur products | High-volume production |
| Tempering Performance | Requires precise control | More forgiving |
| Price Point | Premium | Professional standard |
By understanding cocoa powder and chocolate not as simple commodities but as complex ingredients with distinct personalities, you can move from simply following a recipe to truly designing a dessert. The right choice is always the one that best serves your vision for the final flavor, texture, and appearance on the plate.