
In summary:
- Embrace intentional asymmetry by placing your main element off-center to create visual interest and perceived value.
- Master temperature dynamics, using techniques like the back-of-a-spoon pour for hot sauces on cold desserts to prevent melting.
- Choose your plate like a canvas; use high-contrast colors like white porcelain for dark chocolate to make the dessert pop visually.
You’ve spent hours perfecting a dessert. The flavor is exquisite, the texture is sublime, but when you place it on the plate, it looks… homemade. It’s the common frustration for any passionate home cook: the gap between how a dessert tastes and how it looks. You’ve likely seen the common tips—create a sauce swoosh, add a mint leaf, use a fancy plate. But these are just tactics without a strategy. They often lead to a plate that feels decorated rather than designed, cluttered rather than composed.
The real secret isn’t in owning a dozen different tools or mastering impossibly complex garnishes. The shift from home cook to artist happens when you stop thinking about just adding elements and start thinking like a food stylist. It’s about telling a visual story on the plate, where every component has a purpose, and your spoon becomes the primary instrument of creation. What if the key wasn’t the complexity of the technique, but the intention behind every placement, every color choice, and even the empty space you leave behind?
This guide will deconstruct that professional thought process. We will explore the artistic principles that guide a chef’s hand, from harnessing the power of negative space to manipulating temperature and aroma. You will learn not just *what* to do with your spoon, but *why* you are doing it, transforming your dessert presentation from simply pleasant to truly breathtaking.
For a mesmerizing example of dessert presentation as performance art, the following video shows Chef Grant Achatz creating a masterpiece directly on the table. It’s a masterclass in composition, texture, and creating an unforgettable experience.
To help you navigate these artistic principles, this article is structured to build your skills progressively. Each section tackles a specific question you’ve likely asked yourself, providing the professional logic and a practical technique to immediately elevate your craft.
Summary: Plating Desserts With Artistic Intention
- Why Placing Dessert Off-Center Looks More Expensive?
- How to Shape Ice Cream with Two Spoons?
- Black Slate vs White Porcelain: Which Makes Chocolate Pop?
- The Garnish Mistake That Makes Desserts Look Messy
- When to Add the Sauce: Table-Side or Kitchen?
- How to Pour Espresso Over Gelato Without Destroying the Scoop?
- How to Apply a Sugar Sheet Without It Melting or Tearing?
- Why Does the Smell of Vanilla Trigger Childhood Memories?
Why Placing Dessert Off-Center Looks More Expensive?
The human eye is trained to find symmetry predictable, and in the world of high-end cuisine, predictable is the opposite of luxurious. Placing a dessert perfectly in the center of a plate feels static and expected. By moving the main element off-center, you create intentional asymmetry. This simple shift introduces visual tension and movement, forcing the viewer’s eye to engage with the entire plate, including the “negative space” left empty. This negative space isn’t wasted; it’s a deliberate part of the design that frames the dessert, making it feel more like a deliberate work of art in a gallery than just food on a dish. Restaurants understand this powerful psychological cue, which is partly why 60% of them offer plated desserts; the elevated presentation justifies a higher price point by creating perceived value.
Thinking like a food stylist means you command the entire canvas, not just the part with food on it. The empty space is as important as the dessert itself. It provides breathing room, prevents the plate from looking cluttered, and directs focus. An off-center composition feels more dynamic, sophisticated, and ultimately, more expensive. It’s a confident gesture that says every placement is a conscious choice. To master this, you can use a simple framework that professionals use to guide their placement.
Your Action Plan: The Clock Face Method for Perfect Off-Center Plating
- Position your main dessert element at a dynamic point on the plate, such as the 2, 4, 8, or 10 o’clock positions.
- Use squeeze bottles for sauce application to maintain precise control over where it goes and to protect your negative space.
- Build your composition with four basic features: the main item, a sauce, a crunch element, and a final garnish.
- Start with the sauce decoration on the plate; this creates the visual foundation before you place the main component.
- Aim to leave at least 40% of the plate as negative space to ensure the final composition feels elegant and uncrowded.
By treating the plate as a clock face, you move from random placement to a structured, yet creative, system that guarantees a more professional and visually appealing result every time.
How to Shape Ice Cream with Two Spoons?
A perfect sphere of ice cream from a scoop is familiar and comforting, but it doesn’t scream “haute cuisine.” Professional chefs elevate this simple pleasure by transforming the shape into an elegant, three-sided oval known as a quenelle. While a true quenelle is formed with two spoons passing the ice cream back and forth, many chefs use a faster, equally beautiful technique called a “rocher,” which requires only one spoon and a bit of practice. The rocher is what gives that signature, tapered-egg shape that looks so effortless on the plate.
The key to a successful rocher is temperature and technique. The ice cream must be “tempered”—allowed to soften slightly so it’s pliable but not melting. The magic happens in a single, fluid motion: you drag a warm, deep-bowled spoon through the surface of the ice cream, twisting your wrist upward as you go. This motion causes the ice cream to fold over itself into the desired shape. It’s a technique that replaces the mechanical action of a spring-loaded scoop with the organic, fluid gesture of an artist’s hand.
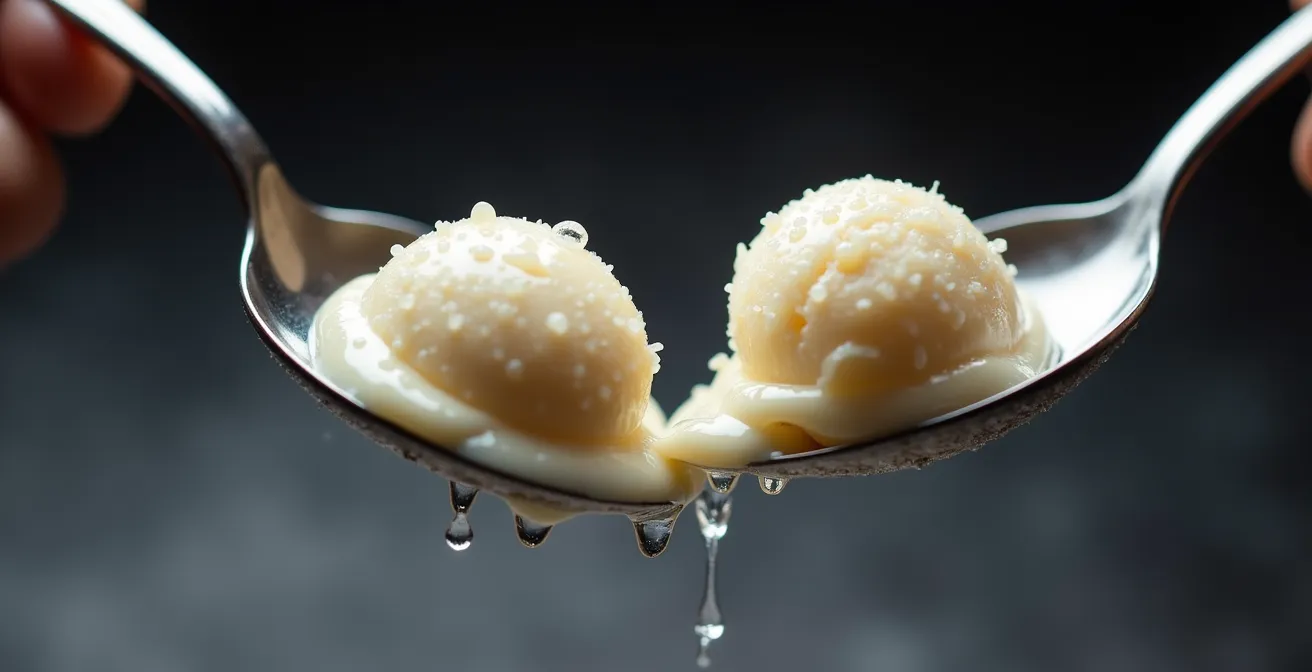
As the image illustrates, the goal is a smooth, seamless surface with defined edges. Mastering the rocher requires a little practice, but it’s one of the most fundamental skills in a pastry chef’s arsenal. You’ll need a spoon with a good, rounded bowl, a cup of hot water to keep the spoon warm (and clean between scoops), and the patience to get your ice cream to the perfect working temperature. The resulting shape immediately signals a higher level of care and intention.
Once mastered, this single-spoon technique becomes a powerful tool in your plating repertoire, allowing you to create stunning, professional-looking scoops that elevate any frozen dessert.
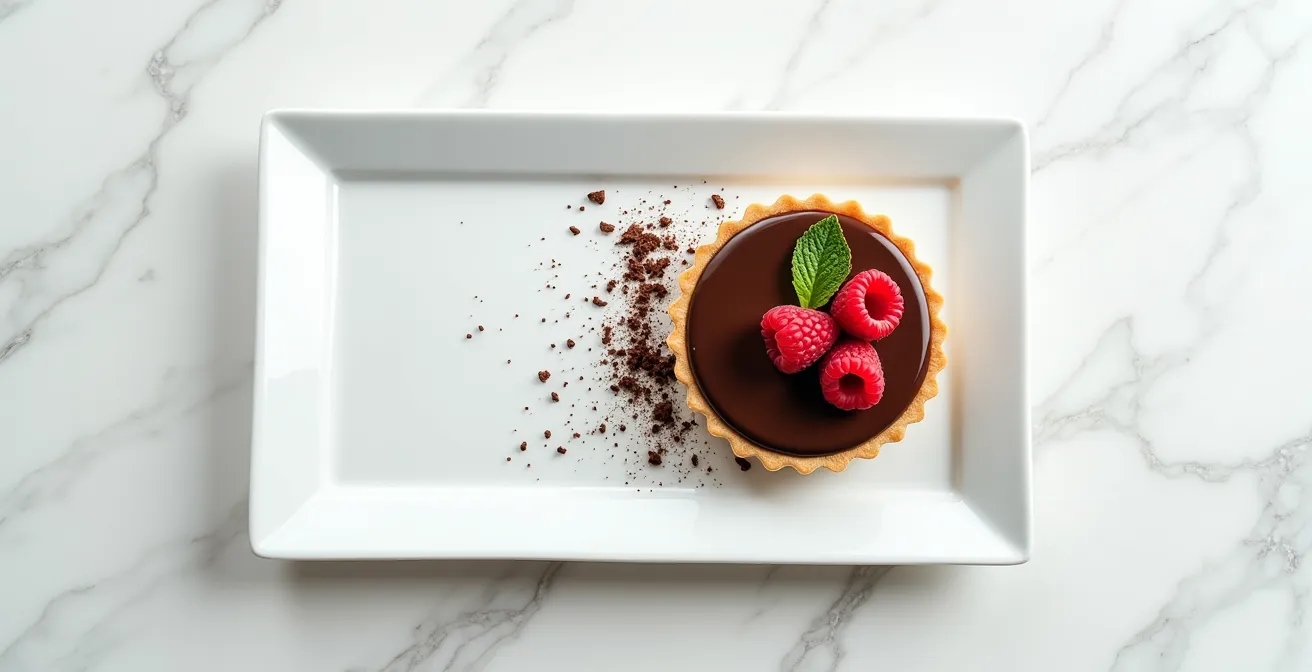
Black Slate vs White Porcelain: Which Makes Chocolate Pop?
The plate is not just a vessel; it is the canvas, and the color of that canvas dramatically affects the perception of the art upon it. When it comes to chocolate, a food defined by its rich, deep colors, the choice of plate is critical. The guiding principle is psychological contrast. Your brain interprets colors and flavors differently based on their background. A dark chocolate dessert on a dark plate can get lost, its details and richness muted. The same dessert on a bright white porcelain plate, however, creates a powerful contrast. The white background makes the chocolate appear darker, glossier, and more intense, highlighting every curve and texture.
Conversely, white chocolate can appear washed-out and bland on a white plate. Place it on a piece of matte black slate, and the effect is electric. The dark, textured background creates maximum contrast, making the creamy white chocolate and any colorful garnishes seem to vibrate with intensity. Black slate lends a dramatic, luxurious, and modern mood to the presentation. The choice of plate, therefore, is not an afterthought but a strategic decision to enhance the visual and perceived flavor of the dessert.
The following guide breaks down how to choose your canvas based on the type of chocolate you are serving, as outlined in a professional guide to dessert presentation.
| Chocolate Type | Best Plate Choice | Visual Effect | Psychological Impact |
|---|---|---|---|
| Dark Chocolate (>70%) | White Porcelain | Makes chocolate appear darker and richer through contrast | Clean, fresh, modern feeling |
| Milk Chocolate | White Porcelain | Highlights caramel tones and intricate details | Elegant and delicate presentation |
| White Chocolate | Black Slate | Creates maximum contrast, makes elements appear more vibrant | Dramatic, luxurious, intense mood |
| Mixed Chocolate Desserts | Black Slate | Best for colorful garnishes and powdered sugar designs | Sophisticated, restaurant-quality appearance |
By selecting your plate with the same care you select your ingredients, you manipulate the visual context to amplify the beauty and appeal of your final creation.
The Garnish Mistake That Makes Desserts Look Messy
The most common garnish mistake is thinking that more is more. A home cook, wanting to impress, might add a sprig of mint, three different berries, a dusting of powdered sugar, and a chocolate curl. The result is often visual chaos, not elegance. The professional approach is driven by restraint and purpose. The biggest mistake is adding any element that doesn’t serve a purpose. Every single item on a professionally plated dessert should be there for one of three reasons: to add a complementary flavor, to introduce a contrasting texture, or to enhance the visual story of the dish. If a garnish does none of these things, it’s just clutter.
Food stylists and chefs follow a set of unwritten rules to avoid this messy look. One of the most important is the “Rule of Odd Numbers.” The human eye finds arrangements in odd numbers (1, 3, or 5) more dynamic and aesthetically pleasing than even-numbered groups. Three raspberries are more interesting than four. Another key rule is scale: the size of the garnish must be proportional to the dessert. A giant mint leaf on a tiny scoop of sorbet looks comical. Finally, professionals are meticulous about cleanliness. They keep the rim of the plate completely clear of any food, sauce, or powdered sugar, as it creates a clean frame and prevents smudges during service.
The ultimate goal is a plate that looks intentional, clean, and edited. Before a plate leaves a professional kitchen, the chef gives it one last look, often with a small brush or towel in hand, to wipe away any stray drips, crumbs, or smudges. This final edit is what separates a good-looking plate from a perfect one. Key rules to remember are:
- Apply the Rule of Odd Numbers: Place garnishes in groups of 1, 3, or 5.
- Ensure every garnish has a purpose: It must add complementary flavor/texture or enhance the theme.
- Match garnish size to dessert scale: Avoid oversized elements on small components.
- Keep the plate rim completely clean to avoid smudges and create a professional frame.
- Only apply sauce to the flat of the plate, never the rim where it can run and look messy.
By embracing the “less is more” philosophy and ensuring every element has a reason to be there, your garnishes will enhance, not detract from, your dessert’s beauty.
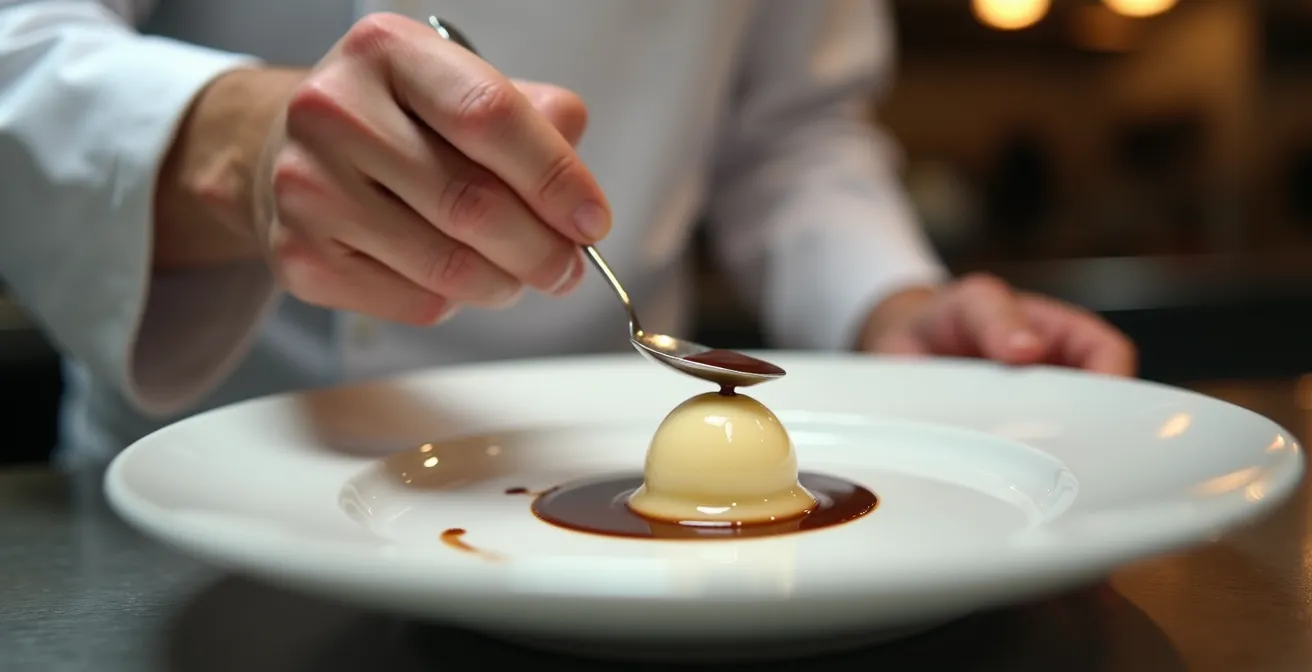
When to Add the Sauce: Table-Side or Kitchen?
The timing of the sauce is a strategic decision that pits two competing artistic goals against each other: Kitchen Control versus Dining Room Drama. There is no single right answer; the choice depends entirely on the experience you want to create for your guests. Applying the sauce in the kitchen, away from the table, gives you ultimate control. You can perfect the placement, wipe away any drips, and ensure the composition is exactly as you envisioned it. This is the path to visual perfection, where the dessert is presented as a finished, static piece of art.
However, adding the sauce at the table introduces an element of performance and sensory architecture. It transforms the dessert from a static object into a dynamic event. The act of pouring a warm caramel sauce over a cool panna cotta, or a vibrant berry coulis around a slice of cheesecake, engages more than just the eyes. It creates sound, releases aroma, and builds anticipation. This tableside flourish makes the guest a participant in the dessert’s final moments of creation. It’s a moment of theatre that can make a simple dessert feel incredibly special and interactive.
So how do you choose? Consider the sauce itself. A thick, opaque sauce that is part of the core visual design (like a chocolate swoosh) should almost always be applied in the kitchen for precision. A thin, translucent, or warm sauce designed to melt or interact with another component is a perfect candidate for tableside drama. For example, a “magic shell” chocolate sauce that hardens on contact with cold ice cream is far more impressive when poured in front of your guests. The decision is a stylistic one: do you want to present a perfect painting, or do you want to stage a small, delicious play?
By consciously deciding between these two approaches, you are thinking like a true food stylist, curating not just the look of the dessert, but the entire experience of eating it.
How to Pour Espresso Over Gelato Without Destroying the Scoop?
The classic Italian affogato—a scoop of vanilla gelato “drowned” in hot espresso—is a masterclass in beautiful simplicity. But its success hinges on a single moment of potential disaster: pouring the hot liquid over the frozen solid. Pouring directly onto the top of the gelato scoop will inevitably cause it to melt rapidly, creating a crater and a soupy mess. The professional’s secret is not to avoid the heat, but to diffuse its impact through clever technique. It’s a perfect example of mastering temperature dynamics on the plate.
The most elegant and effective method is the Back-of-Spoon Technique. By holding a warm, clean spoon inverted just above the gelato, you create a makeshift ramp. When you pour the hot espresso slowly onto the back of the spoon, the stream is diffused into a gentle cascade that flows over and around the scoop instead of drilling into it. The spoon absorbs and distributes the initial thermal shock, preserving the gelato’s structural integrity for a few crucial moments, allowing for a beautiful presentation before it slowly begins to meld with the coffee.
To execute this perfectly, follow these simple but critical steps:
- For maximum thermal resistance, pre-freeze the scooped gelato on its serving plate or in its glass for 10 minutes before serving.
- Heat your serving spoon in hot water and dry it quickly. A warm spoon prevents the espresso from cooling too rapidly on contact.
- Hold the spoon with its back facing up, almost touching the highest point of the gelato scoop.
- Pour the hot espresso slowly and steadily onto the center of the spoon’s back.
- Use a narrow-spouted pitcher, like one used for frothing milk, for maximum pouring control.
An alternative method, which creates more guest interaction, is to pour the espresso into the bottom of the bowl, creating a “moat” around the gelato and allowing the guest to combine them as they please.
This simple spoon technique is a game-changer, transforming a potentially messy pour into a graceful and controlled performance that respects the integrity of your dessert.
How to Apply a Sugar Sheet Without It Melting or Tearing?
Delicate sugar work, like a paper-thin sugar sheet or an intricate spun sugar cage, can be a breathtaking final touch on a dessert. It can also be a source of immense frustration, as these fragile creations have a tendency to melt, weep, or tear the moment they touch a moist or warm surface. The enemy here is a combination of moisture and temperature differential. The secret to success lies in a core principle of pastry arts: strict temperature control. As pastry instructor Chef Billie Sutton emphasizes, the rule is absolute.
Cold food should be plated on cold dishes, hot food on hot dishes
– Chef Billie Sutton, Escoffier School of Culinary Arts
Applying this rule to sugar work means ensuring that the dessert surface the sugar will touch is as cold and dry as possible. A common professional technique to achieve this is the “freezer burst” method. Right before you are ready to apply the sugar decoration, the entire plated dessert (minus the sugar work) is placed in the freezer for 5 to 10 minutes. This process flash-chills the surface of the dessert—be it mousse, ice cream, or cake—creating a firm, cold, and less humid landing pad. When the delicate sugar sheet is placed on this super-chilled surface, its contact time with warmth and moisture is minimized, dramatically reducing the risk of it melting or tearing upon application.
The handling of the sugar sheet itself is also critical. Your hands are warm and can quickly melt the delicate structure. Whenever possible, use tweezers or wear food-safe gloves to handle the sugar work. Plan your placement in advance so you can apply it with a single, confident motion. Don’t try to slide or reposition it once it has made contact. This combination of a super-chilled base and careful handling is the professional’s insurance policy against last-minute sugar work disasters.
By mastering the environment’s temperature, you gain control over even the most fragile and ephemeral elements of dessert decoration.
Key takeaways
- Plating is visual storytelling; every element must have a purpose, whether it’s flavor, texture, or narrative.
- Mastering contrast is key: use contrasting plate colors to make ingredients pop, and contrast temperatures for a dynamic sensory experience.
- Embrace restraint and intentionality, particularly with negative space and garnishes, to achieve a clean, sophisticated, and professional look.
Why Does the Smell of Vanilla Trigger Childhood Memories?
Of all the tools in a pastry chef’s arsenal, perhaps none is more powerful than aroma. While visual beauty creates desire, scent is what creates a deep, emotional connection. And no scent is more universally evocative than vanilla. The reason the smell of vanilla can instantly transport you back to your grandmother’s kitchen is a matter of brain anatomy. The olfactory bulb, which processes smells, has a direct and uniquely privileged pathway to the brain’s limbic system, particularly the amygdala (which processes emotion) and the hippocampus (which is responsible for memory). No other sense has such an immediate and unfiltered link to our emotional and memory centers.
This powerful connection is something chefs are increasingly harnessing through a trend known as “Newstalgia”—the art of taking a familiar, nostalgic flavor or concept and giving it a modern, sophisticated twist. This is a major driver of consumer behavior, as the Datassential 2024 Food Trends Report identifies newstalgia as a key trend driving spending. When you serve a dessert with a prominent vanilla aroma, you are not just serving a sweet treat; you are serving a powerful dose of comfort, safety, and personal history. The visual presentation draws them in, but the aroma is what makes them feel at home.
As a food stylist, you can strategically amplify this effect. The goal is to time the release of the aroma for maximum impact, often at the table.
- Warm vanilla pods slightly before service to intensify the release of their aromatic oils.
- For a subtle, surprising scent, rub a vanilla bean on the rim of the plate just before serving.
- Pair vanilla’s comforting aroma with equally comforting visuals, like soft-looking cakes or perfect, round scoops of ice cream.
- Incorporate vanilla in multiple formats: use extract in the cake, a bean as a garnish, and an essence in a warm sauce poured tableside to create an aromatic “cloud.”
By understanding and intentionally manipulating aroma, you complete the sensory architecture of your dessert, transforming it from a beautiful object into an unforgettable, multi-sensory experience.