

In summary:
- Crema is a diagnostic tool, not just foam. Its absence points to a specific system failure.
- Stale beans are the primary culprit; they lack the CO2 gas necessary for crema formation.
- Your technique (grind size and tamping) must create enough resistance for the machine’s pressure to work correctly.
- Pressurized “crema-enhancing” baskets produce a false, bubbly foam, not true crema.
- Hidden coffee oil residue inside your machine actively destroys crema.
You see it in every café and advertisement: a rich, velvety, reddish-brown layer of foam sitting atop a perfect shot of espresso. That is the crema. Yet, when you pull a shot at home, you’re often met with a dark, flat, and lifeless liquid. It’s a frustrating experience for any home barista who has invested in a machine with the promise of café-quality coffee. The common advice is to “use fresh beans” or “grind finer,” but this often feels like guesswork and rarely solves the problem consistently.
The issue is approaching this without a system. From a technician’s perspective, the lack of crema isn’t a single mistake; it’s a diagnostic signal. That foam is the result of a precise chemical and physical process: the emulsification of coffee oils with carbon dioxide (CO2) gas under intense pressure. If any component in that system fails—the beans, the grind, the tamp, the pressure, or the machine’s cleanliness—the crema is the first thing to disappear. It’s your machine’s primary diagnostic screen, telling you exactly where the fault lies.
Forget the guesswork. The real key is to stop seeing crema as the goal and start using it as data. This guide will walk you through a systematic, diagnostic process, examining each component of the espresso system. We will isolate each variable, from the chemical properties of your beans to the hydraulic pressure of your machine, to identify the root cause of your crema failure and provide the immediate fix.
For those who prefer a visual walkthrough, the following video offers an excellent overview of diagnosing common extraction problems and will complement the detailed technical checks we are about to perform.
To effectively troubleshoot your espresso, we will proceed methodically through the most critical factors that govern crema production. The following sections break down each potential point of failure, providing the technical explanation and a clear solution, just as a technician would on a service call.
Summary: A Technician’s Diagnostic Guide to Restoring Espresso Crema
- Why Stale Beans Produce Zero Foam on Your Espresso?
- How to Tamp Level to Ensure Uniform Crema Extraction?
- Pressurized vs Non-Pressurized Baskets: Which Fakes the Crema?
- The Cleaning Mistake That Kills Crema Production
- When Does Crema Dissipate: Is It Bad if It Vanishes Quickly?
- Why Robusta Creates Thicker Crema Than Arabica?
- Why Nitrogen Bubbles Are Smaller and Smoother Than Soda?
- 9 Bars of Pressure: Why This Number Matters for Your Crema?
Why Stale Beans Produce Zero Foam on Your Espresso?
This is the most common point of failure, and it’s purely a matter of chemistry. Crema is fundamentally made of microbubbles of CO2 gas that are dissolved in the coffee bean during the roasting process. When hot, pressurized water hits the coffee grounds, this gas is released and emulsifies with the coffee’s natural oils. Stale beans have simply lost their gas. Research shows that a coffee bean can lose an incredible amount of its potential crema-forming gas very quickly; in fact, over 40% of its CO2 is released within the first 24 hours after roasting. After a few weeks, there is simply not enough gas left to create a stable foam matrix.
The “best by” date on a bag of coffee is a marketing term for shelf life; it has nothing to do with freshness for espresso. You must look for a “roasted on” date. The ideal window for espresso extraction is between 5 and 21 days post-roast. Before that, the beans may be too gassy, leading to an uneven extraction. After that, they are likely too degassed to produce a rich, stable crema. If your beans don’t have a roast date, they are almost certainly too old for quality espresso.
To stop guessing about your beans’ viability, you need a clear, actionable diagnostic process. The following checklist provides a series of simple tests you can perform to verify bean freshness before you even grind them.
Action Plan: Test Your Bean Freshness
- Visual & Aural Checks: Check for a “roasted on” date within the 5-21 day window. When you open a fresh bag, you should hear a distinct “whoosh” of escaping gas.
- Seal Test: Place a handful of beans in a zip-top bag, press out the air, and seal it overnight. If the bag has puffed up by morning, the beans are still actively degassing and are fresh.
- Oily Sheen Inspection: For medium to dark roasts, look for a slight oily sheen on the surface of the beans. This indicates that the internal oils are fresh and have been brought to the surface during roasting.
- Sample Shot Diagnosis: Pull a test shot. Fresh beans will produce a stable, golden-brown crema that lasts. If you get a thin, pale foam that vanishes in seconds, your beans are the primary suspect.
- Sourcing Audit: Purchase beans from local roasters or online suppliers who display the roast date prominently. Avoid supermarket beans without this crucial piece of data.
How to Tamp Level to Ensure Uniform Crema Extraction?
If your beans are fresh, the next system component to diagnose is the coffee puck itself. Your tamp is not just about pressing down the coffee; it’s about creating a puck with uniform density. This uniformity provides consistent hydraulic resistance against the 9 bars of pressure from your machine. If your tamp is uneven, too light, or too hard, water will exploit the weakest point, a phenomenon known as channeling. Water that channels through the puck fails to extract evenly and, critically, fails to emulsify the oils needed for crema.
A common mistake is focusing only on pressure (the oft-quoted 30 lbs) while neglecting levelness. An unlevel tamp is a guaranteed cause of channeling. Water will rush through the thinner side, under-extracting it and leaving the thicker side under-saturated. The result is a shot that is simultaneously sour and bitter, with a thin, patchy crema that disappears instantly. Using a calibrated tamper can help you learn the feel of 30 lbs, but practicing a level, even press is far more important for crema quality.
The relationship between tamping pressure, extraction time, and the resulting crema is direct and predictable. The table below serves as a diagnostic chart to help you identify tamping errors based on the visual evidence from your shot.
| Tamping Pressure | Extraction Time | Puck Condition | Crema Quality |
|---|---|---|---|
| Too Light (< 15 lbs) | < 20 seconds | Soupy, wet | Thin, dissipates quickly |
| Optimal (30 lbs) | 25-30 seconds | Firm, intact | Thick, golden, stable |
| Too Hard (> 40 lbs) | > 35 seconds | Cracked, channeled | Dark, bitter, uneven bubbles |
After extraction, your used coffee puck is a data-rich diagnostic tool. A perfectly extracted puck will be firm, dry, and pop out of the portafilter in one piece. The image below shows the uniform, granular texture of a puck after an even extraction, with no visible cracks or holes that would indicate channeling.
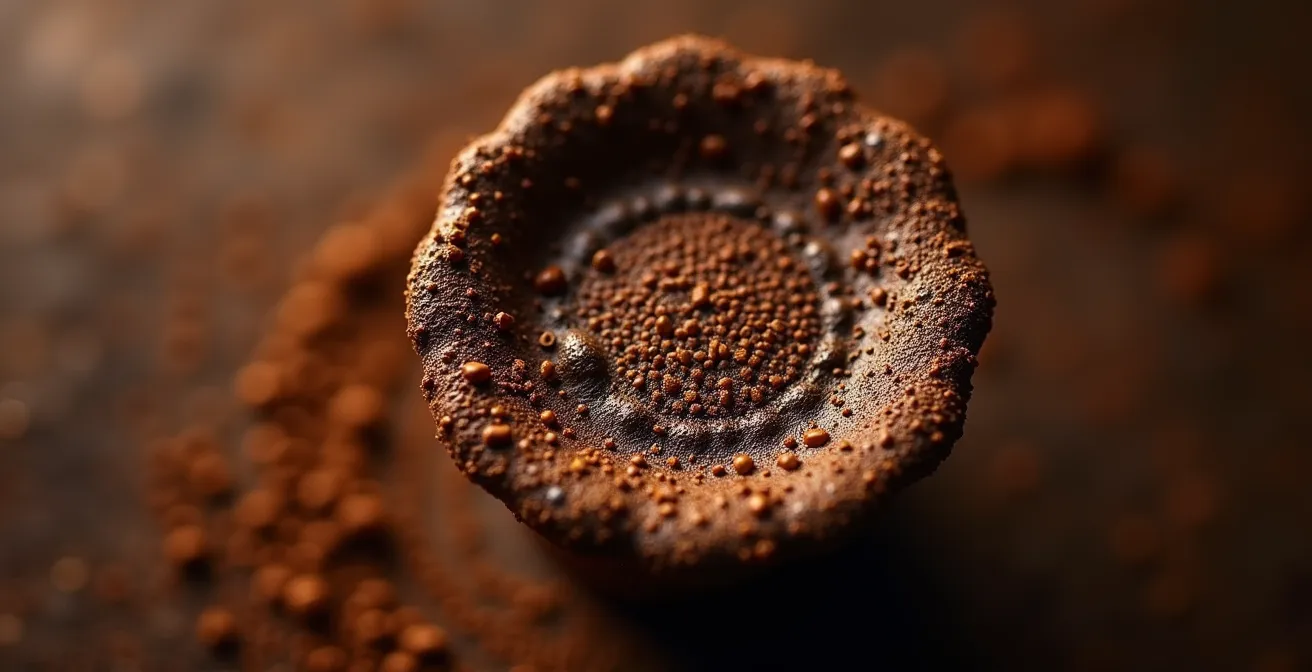
Analyzing your puck against this ideal provides clear feedback on your tamping and distribution technique. Any deviation from this uniform appearance points to a correctable error in your puck preparation, directly impacting your crema’s quality and stability.
Pressurized vs Non-Pressurized Baskets: Which Fakes the Crema?
This is a critical distinction that trips up many new home baristas. Many entry-level espresso machines come with a “dual-wall” or pressurized portafilter basket. These baskets have a single exit hole on the bottom, which artificially creates back-pressure. This pressure forces the coffee through the hole, aerating it and creating a thick, bubbly foam. This is not real crema. It’s a foam made mostly of air, which looks impressive but has large bubbles, a light color, and dissipates very quickly. It lacks the rich flavor and velvety texture of true, emulsified crema.
A non-pressurized basket, the standard in all commercial cafés, has a bottom screen filled with hundreds of tiny holes. With these baskets, the coffee puck itself—your grind size and tamp—is solely responsible for creating the necessary resistance for extraction. This is how true crema is formed. The pressure must emulsify the oils and CO2 from the bean, not just force liquid through a tiny hole. Using a non-pressurized basket is a step up in your barista journey; it gives you full control and the potential for genuine, high-quality crema, but it also mercilessly reveals any flaws in your beans, grind, or technique.
The transition from a pressurized system to a non-pressurized one can be challenging, but it’s essential for achieving authentic crema. The process requires a complete recalibration of your technique, especially concerning your grinder and tamping pressure.
Case Study: The Switch to Authentic Crema
A home barista, frustrated by the lack of real crema from their machine, learned that their pressurized basket was the culprit. It required only a light tamp (4-7 lbs) and was forgiving of a blade grinder. After upgrading to a burr grinder and switching to non-pressurized baskets, their first shots were disastrously fast and produced no crema at all. By methodically adjusting the grind size finer and applying the standard 30 lbs of tamping pressure, they began to build the necessary resistance in the coffee puck. Within a week of refining this new technique, they successfully pulled a shot with thick, stable, and authentic crema, demonstrating that the equipment and technique must work together as a system.
The Cleaning Mistake That Kills Crema Production
You could have the freshest beans and perfect technique, but a dirty machine will still kill your crema. The culprit is rancid coffee oil. The same oils that are essential for creating crema become its worst enemy when they are left to build up inside your machine’s group head, portafilter, and filter baskets. Over time, these oils oxidize and go rancid. From a chemical standpoint, stale oils act as anti-foam agents, actively breaking down the delicate bubble structure of the crema as it forms.
If your shots start tasting unusually bitter or acrid, and your once-great crema suddenly vanishes, a buildup of old coffee oil is the most likely cause. A simple water flush of the group head is not enough to remove this residue. It requires dedicated espresso machine cleaner, which is formulated to dissolve these stubborn oils. A weekly backflush with this cleaner and a thorough soak of your portafilter and baskets are non-negotiable maintenance tasks for any serious home barista. This isn’t just about hygiene; it’s a critical step in maintaining the chemical integrity of your extraction system.
Ignoring regular, deep cleaning is like trying to cook a gourmet meal in a dirty pan. The old, burnt flavors will contaminate the new. A consistent cleaning schedule is the only way to ensure that each shot is brewed in a pristine environment, allowing the fresh oils from your grounds to form a perfect crema without interference.
- Daily: Flush the group head for a few seconds before and after each session. Wipe your portafilter basket clean after every shot.
- Weekly: Perform a backflush cycle using an espresso machine cleaning powder. Disassemble and soak your portafilter and baskets in the same cleaning solution.
- Monthly: Descale the machine according to the manufacturer’s instructions, especially if you live in a hard water area. Mineral scale can affect pressure and temperature stability.
- Quarterly: Inspect the group head gasket and shower screen for wear and tear. A worn gasket can cause leaks, leading to a loss of pressure and poor extraction.
When Does Crema Dissipate: Is It Bad if It Vanishes Quickly?
Yes, if your crema vanishes in under a minute, it is a clear diagnostic sign of a flawed extraction. A well-extracted shot should have a crema that is dense and stable enough to last for at least two minutes. Quick dissipation indicates that the foam structure is weak, typically because it’s made of large, fragile bubbles instead of a tight matrix of microbubbles. This is a classic symptom of under-extraction. This happens when the water flows through the coffee puck too quickly (a “gusher” shot, often under 20 seconds), usually due to a grind that is too coarse or a tamp that is too light.
The appearance of the crema as it forms and as it rests is your most immediate feedback tool. You can diagnose the quality of your shot long before you taste it. A crema that is very light, pale, and bubbly points to an under-extracted, sour shot. Conversely, a crema that is extremely dark, splotchy, and has a black ring around the edge indicates over-extraction. This happens when the water flows too slowly (over 35 seconds), usually from a grind that is too fine or a tamp that is too hard, resulting in a harsh, bitter taste.
The “ideal” crema is a golden to reddish-brown color, with a fine, velvety texture sometimes referred to as “tiger-striping.” It should be thick enough to support a spoonful of sugar for a few seconds before it sinks. This table, based on a diagnostic analysis of crema characteristics, helps translate what you see in the cup into a specific problem with your technique.
| Crema Appearance | Duration | Extraction Issue | Expected Taste |
|---|---|---|---|
| Light, large bubbles | < 1 minute | Under-extraction | Sour, weak |
| Golden-brown, fine bubbles | 2+ minutes | Optimal extraction | Balanced, sweet |
| Dark, almost black | Variable | Over-extraction | Harsh, bitter |
| Thin but stable | 1-2 minutes | Light roast/100% Arabica | Nuanced, acidic |
Why Robusta Creates Thicker Crema Than Arabica?
Not all coffee beans are created equal when it comes to crema potential. The two major species of coffee, Arabica and Robusta, have fundamentally different chemical compositions. Arabica beans are prized for their complex, aromatic, and acidic flavor profiles. However, they are lower in both caffeine and lipids (oils), and they tend to have a lower concentration of dissolved solids. This results in a crema that is often lighter in color, thinner in body, but can be very sweet and aromatic.
Robusta beans, on the other hand, are a powerhouse for crema. They can contain almost double the caffeine and significantly more lipids than Arabica beans. This higher oil content is crucial for creating a thicker, more stable, and longer-lasting emulsification. The resulting crema is often darker, more substantial, and visually impressive. However, this comes at a cost to flavor; Robusta is typically described as tasting more rubbery, bitter, or chocolatey, and it lacks the nuanced acidity of a high-quality Arabica.
This difference is not a matter of quality but of purpose. Roasters have long used this knowledge to engineer specific outcomes in their espresso blends. It’s a classic case of balancing visual appeal with flavor complexity.
Case Study: The Italian Blending Strategy
The classic, ultra-thick crema seen in traditional Italian espresso is no accident. It is often the result of a carefully engineered blend. As demonstrated by the traditional Italian blending strategy, roasters intentionally include a percentage of Robusta beans (typically 10-30%) in their espresso blends. Robusta acts as a “blending tool” specifically to enhance crema production and mouthfeel. This strategy knowingly trades some of the flavor complexity of a 100% Arabica blend for the guaranteed visual appeal and textural richness of a thick, persistent crema, creating the iconic Italian espresso experience.
Why Nitrogen Bubbles Are Smaller and Smoother Than Soda?
To fully appreciate the texture of a good crema, it’s helpful to understand the science of gas solubility. The smooth, velvety mouthfeel of a perfect crema is similar to that of a nitrogen-infused stout beer, and for the same reason: the size of the gas bubbles. The primary gas in espresso crema is CO2, but its behavior under pressure creates a texture far different from a carbonated soft drink.
In soda, CO2 is forced into water at a high pressure, but the bubbles remain relatively large and eager to escape, creating a sharp, prickly sensation. In espresso extraction, the process is more complex. The 9 bars of pressure don’t just dissolve the CO2; they create an emulsified supersaturation of gas within the coffee oils. When this liquid exits the portafilter and returns to normal atmospheric pressure, the gas expands out of the solution, but it does so within the viscous matrix of oils, forming millions of stable microbubbles. This is analogous to how nitrogen, which is less soluble than CO2, creates the famously smooth, cascading foam in a stout.
The result is a foam that is dense and creamy rather than light and fizzy. The image below illustrates this cascading effect as the crema settles, showing the fine, layered structure of the micro-foam which is responsible for the desired texture.

This fine bubble structure is what gives crema its signature velvety mouthfeel and its ability to carry the coffee’s most volatile aromatics. A crema with large, coarse bubbles is a sign of a failed emulsification, often due to stale beans (not enough gas) or poor extraction (not enough oil extracted).
Key takeaways
- Crema is a direct result of CO2 gas from fresh beans emulsifying with coffee oils; a failure in either component means no crema.
- Your technique (grind, distribution, and tamp) is about creating the perfect hydraulic resistance for the machine’s pressure to work effectively.
- True crema is a sign of a mastered process using non-pressurized baskets; “crema-enhancing” baskets produce a fake, flavorless foam.
9 Bars of Pressure: Why This Number Matters for Your Crema?
The final component in our diagnostic system is the machine itself: the force it generates. The 9-bar standard for espresso pressure is not an arbitrary number. It is the optimal pressure required to force water through a correctly prepared coffee puck to achieve proper emulsification. At approximately 9 times normal atmospheric pressure, water is able to effectively dissolve the coffee’s oils and aromatic compounds while simultaneously extracting the CO2 gas from the grounds. This precise combination of pressure and resistance is what forges the coffee oils and gas into the stable, velvety foam we call crema.
If the pressure is too low (below 7-8 bars), the water will not have enough force to properly emulsify the oils. It will seep through the coffee too slowly and gently, resulting in an under-extracted shot with thin, weak crema. If the pressure is too high (above 10-11 bars), it can blast through the puck, causing channeling and over-extraction, leading to a dark, bitter crema. Most modern consumer machines are calibrated to produce this pressure, but issues with the pump, scale buildup, or a faulty over-pressure valve (OPV) can cause deviations.
While you may need a technician to fix a machine’s internal pressure, you can diagnose it by observing the extraction. If you have fresh beans, a good grinder, and solid tamping technique, but your shots are consistently too fast or too slow, pressure may be the issue. The goal is to have all system components working in harmony.
- Below 7 bars: Insufficient force. Water seeps through the puck, resulting in under-extraction, a sour taste, and thin, pale crema.
- 8-9 bars: The optimal range. This pressure effectively emulsifies oils and dissolves CO2, creating a rich, stable, golden-brown crema.
- 9-10 bars: Generally acceptable. May produce a slightly darker crema and a more intense shot, but still within a quality range.
- Above 11 bars: Excessive force. This high pressure often leads to channeling, over-extraction, and a dark, splotchy, and intensely bitter crema.
By systematically working through these diagnostic checks, you are no longer guessing. You are acting as your own espresso technician. Start with the most likely and easiest-to-fix variable—your beans—and methodically move through your technique and equipment. Restoring your espresso’s crema is a matter of identifying and correcting the specific point of failure in the system.